TSOP - IR Receiver
The TSOP SM0038 is an IR receiver. The TSOP will help you to interface your TV remote with the Arduino and in the Process learn the basics of Wireless Communication.
Technique
to decode this signal train, would be to constantly monitor the TSOP
pin[Digital 15] for its normal state and the moment it produces a low
signal, measure the duration of the low signal. If the measured duration
of the low signal is around 2ms then measure and store the duration for
the next 12 bits of the incoming data. After storing the data, evaluate
the duration and based on the duration convert the data to decimal /
hexadecimal and use it in your application.
Wire it up
Before wiring the TSOP, remove the DS1307 part alone from the breadboard.
There is an interesting IR remote library that can help you read different remotes without any difficulty. [This is included in the zip file]
How to use Libraries in Arduino - An Overview
To use any library you download, unzip the downloaded file and copy its contents to the libraries folder inside your arduino directory. You can check the library by opening the arduino ide and going to Sketch -> Import Library Option, if your library is in the proper location, it will show up here. Next if there is an example provided with the library (it will be inside a folder called example inside the base folder of the library) it will show up under the libraries name in the File->Examples Menu. You should reopen Arduino for the library to show up.
Once you install the IRremote Library, You can try the example program, IRrecvDemo. This program will give you a serial output of the HEX code for each value corresponding to each button on a remote. We will be using the decimal value in our next program. To get the decimal value, just do the following modification
change this line
from
int RECV_PIN = 11;
to
int RECV_PIN = 12; // we have the lcd using the 11th pin ;)
replace this line
Serial.println(results.value, HEX);
with
Serial.println(results.value);
Here is the modified code [TSOP_IRrecvDemo.ino]
Now lets try to display the remote button value on the LCD. [LCD_TSOP.ino]
The TSOP SM0038 is an IR receiver. The TSOP will help you to interface your TV remote with the Arduino and in the Process learn the basics of Wireless Communication.
The
TSOP outputs a constant HIGH signal when idle and as it receives data,
it tends to invert the data. i.e when an IR LED is transmitting data
onto the TSOP, everytime the IR led goes high, the TSOP will go LOW and
vice versa. Remote control signals are often bytes of data that is
encoded and transmitted by pulsing(switching ON & OFF the IR LED at a
specific frequency) Most TV remote controls work at 32-40 Khz frequency
and most receivers can receive this range.
Heres
a link to a nice write up on different remote control protocols. lets
first take a look how the Sony Remote Control Protocol Works. We stick
to Sony as it is the easiest one to get started with. Read this before proceeding
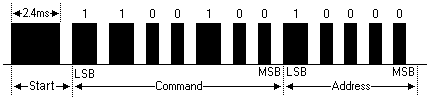
Here's
a basic outline of how the data is sent. Every time you press a button
on a Sony remote control, it sends out a 13Bit data. The first bit is a
start bit indicating there are 12 bits of data following it. The next 7
bits are the command bit which will vary depending upon the keys being
pressed. The last 5 bits are the address bits which will the same for
all buttons but vary for remote controls of different devices.
The
black bars in the following image correspond to high signals (called
marks) and the white spaces in between correspond to low signals (called
spaces). The duration of the 'marks' varies according to the bit being
transmitted. It is 2.4ms for the start bit, 1.2ms for HIGH bit and 0.6ms
for LOW bit. The duration of the 'spaces' is a constant 0.6ms. Every
mark is followed by a space. Any data can be converted to binary format
and transmitted in this manner. In fact this is the basic form of all
types of serial communication.
The duration of a signal on an input pin of the arduino can be measured using the pulseIn function. Read more about this function here
Before wiring the TSOP, remove the DS1307 part alone from the breadboard.
 |
| TSOP Pin Mappings |
 |
| The TSOP 1738 |
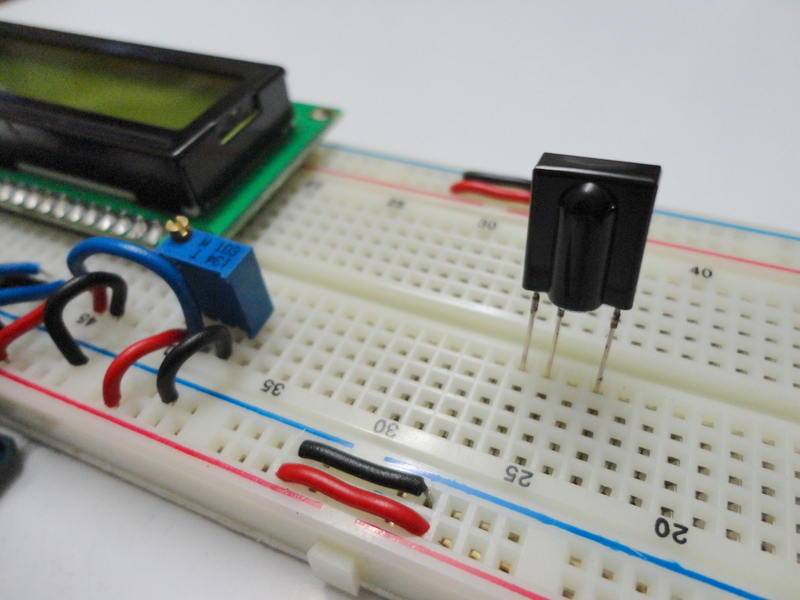 |
| Place the TSOP on the Breadboard as Shown |
 |
| Connect a wire between the 1st pin of the TSOP and the '-'ve terminal |
 |
| Connect a wire between the 2nd pin of the TSOP and the '+'ve terminal |
 |
| Connect a Wire between the 3rd pin of the TSOP and digital pin 12 of the Arduino |
 |
| A Closeup of the Previous step! |
There is an interesting IR remote library that can help you read different remotes without any difficulty. [This is included in the zip file]
How to use Libraries in Arduino - An Overview
To use any library you download, unzip the downloaded file and copy its contents to the libraries folder inside your arduino directory. You can check the library by opening the arduino ide and going to Sketch -> Import Library Option, if your library is in the proper location, it will show up here. Next if there is an example provided with the library (it will be inside a folder called example inside the base folder of the library) it will show up under the libraries name in the File->Examples Menu. You should reopen Arduino for the library to show up.
Once you install the IRremote Library, You can try the example program, IRrecvDemo. This program will give you a serial output of the HEX code for each value corresponding to each button on a remote. We will be using the decimal value in our next program. To get the decimal value, just do the following modification
change this line
from
to
int RECV_PIN = 12; // we have the lcd using the 11th pin ;)
replace this line
with
Serial.println(results.value);
Here is the modified code [TSOP_IRrecvDemo.ino]
/*
 * IRremote: IRrecvDemo - demonstrates receiving IR codes with IRrecv
 * An IR detector/demodulator must be connected to the input RECV_PIN.
 * Version 0.1 July, 2009
 * Copyright 2009 Ken Shirriff
 * http://arcfn.com
 */

#include <IRremote.h>

int RECV_PIN = 12;

IRrecv irrecv(RECV_PIN);

decode_results results;
int remote = 0;

void setup()
{
  Serial.begin(9600);
  irrecv.enableIRIn(); // Start the receiver
}

void loop() {
  if (irrecv.decode(&results)) {
    remote = results.value;
    Serial.println(remote);
    irrecv.resume(); // Receive the next value
  }
}
Now get your remote and make note of the values you get for pressing various buttons.
Now lets try to display the remote button value on the LCD. [LCD_TSOP.ino]
/*
The following program uses the IRremote library and displays the value of the button being pressed on the LCD
*/

#include <IRremote.h>
#include <LiquidCrystal.h>
/*
List of Values corresponding to numbers of the remote being pressed, remember to replace these values with the values you get.
1 16
2 2064
3 1040
4 3088
5 528
6 2576
7 2960
8 3600
9 272
0 2320
*/
// initialize the library with the numbers of the interface pins
LiquidCrystal lcd(2,4,8,9,10,11);

int RECV_PIN = 12;

IRrecv irrecv(RECV_PIN);

decode_results results;
int remote = 0, display_value=0;


void setup()
{
  lcd.begin(16,2);
  irrecv.enableIRIn(); // Start the receiver
}

void loop() {
  if (irrecv.decode(&results)) {
    remote = results.value;
    switch(remote)
    {
      case 16 : display_value=1; break;
      case 2064 : display_value=2; break;
      case 1040 : display_value=3; break;
      case 3088 : display_value=4; break;
      case 528 : display_value=5; break;
      case 2576 : display_value=6; break;
      case 2960 : display_value=7; break;
      case 3600 : display_value=8; break;
      case 272 : display_value=9; break;
      case 2320 : display_value=0; break;
    }
    lcd.clear();
    lcd.print(display_value);
    irrecv.resume(); // Receive the next value
  }
}
which remote contol did u use???
ReplyDeleteA Sony TV remote
DeleteYou used RM-W104 Right...
DeleteI am getting an error...
ReplyDeleteIRrecv does not name a type
This comment has been removed by the author.
DeleteBest Tutorial :) Thank you sir :)
ReplyDeleteNice, can you please help me with code for ATMega8 (not Arduino) ?
ReplyDeleteThank you. It will be a great help if you culd e-mail at
siddhc[at]gmail[dot]com
Thanks agaian.
Is it possible to controll power also can any one help me
ReplyDeleteiam trying to controll switches of house using IR_REC is it possible if it help me
IIIB.S.C M.E.Cs
IRrecvDemo:13: error: 'IRrecv' does not name a type
ReplyDeleteIRrecvDemo:15: error: 'decode_results' does not name a type
IRrecvDemo.ino: In function 'void setup()':
IRrecvDemo:21: error: 'irrecv' was not declared in this scope
IRrecvDemo.ino: In function 'void loop()':
IRrecvDemo:25: error: 'irrecv' was not declared in this scope
IRrecvDemo:25: error: 'results' was not declared in this scope
I'm getting inconsistent values. Could you help me
ReplyDelete